
Winter Wonderland
Along with the colder weather and the first substantial snowfall, this blog post focuses on the outside work you should remember to do to maintain your house through the season.

If you have a gas furnace or water heater, the exhaust needs get to the outside. Carried by pipes, the fumes either go through the side of the house or up through the roof. The safe operation of the furnace and water heater requires that the exhaust vents need to be clear of snow and have an unobstructed airflow around the terminals; otherwise, the fumes may back up into your home. Following any snowfall, especially with blowing snow, you need to check the vents to verify they are not sitting in a snowdrift or under that layer of snow. To be completely safe, clear any snow from around the vent for at least 1 meter (3 feet) to allow proper airflow. Don’t forget to also check the termination for the bathroom vent, the drier exhaust vent, the range exhaust vent, and fireplace exhaust vent if you have one. Although they might not pose a risk of carbon monoxide poisoning, they can lead to higher moisture levels in the house if they are blocked, leading to mold growth and damage to the interior components of the house.

If you are heating your house with a heat pump, clearing the snow from your exterior components (compressor and coil) is a manufacturer’s requirement. It will improve the efficiency of the heat pump and maintain the life expectancy of the appliance. Here is short report from the CBC on how to care for a heat pump in the winter. How to care for your heat pump during a winter storm | CBC News
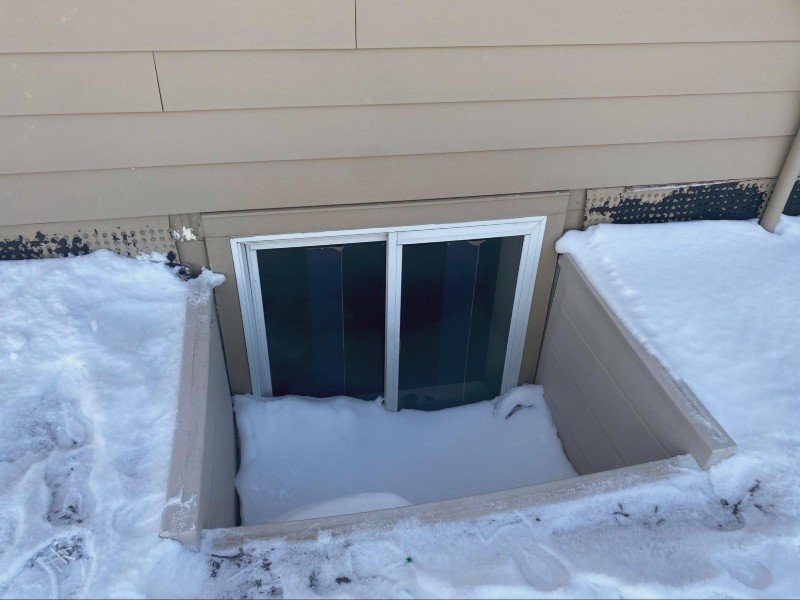
Snow likes to settle in window wells and below grade windows. This means you need to be clearing snow from these areas as well. Even in cold winter temperatures, there is enough heat leaking through the window panes that snow will start to melt. The melting water can lead to ice buildup at the window that damage your window’s sills and frames, increasing the possibility of water leaking into the house. In addition, if you have an egress window, this needs to be clear of snow so it can serve its purpose as an emergency exit during a fire.

Your roof and raised deck are often ignored or forgotten during the winter season because of a lack of awareness of the damage that snow can pose. A heavy dumping of snow can lead to an excessive amount of weight or snow load on the roof and deck. This additional weight can lead to a structural collapse. Your deck, if built to the building code, should be able to hold 40 to 60 lbs/ft² while the roof should be able to support 20 to 40 lbs/ft². To calculate the maximum depth of snow, take the load rating (I would recommend 30 lbs/cubic foot for a roof and 50 lbs/cubic foot for a deck) and divide it by the type of snow. The table below lists the expected weight of snow under various conditions. For fresh snow, the roof can have 30/3.75 = 8 ft and the deck can have 50/3.75 = 13 ft. For a snow drift (wind-packed snow), the depth of the snow would be 30/23.41 = 1.3 feet for a roof and 50/23.41 = 2.1 ft for a deck. That is quite the difference in heights for the snow pack. For convenience, the roofing and decking experts recommend removing any amount of snow over 2 ft for a roof and 3 ft for a deck. In addition, it is also recommended that you clear all the snow on the deck or roof that is directly next to a wall because melting snow there can damage the facade of the house and, in the case of a deck, the wall and ledger board.
|
Type of Snow |
Snow density (lbs/cubic foot) |
|
Fresh snow |
3.75 |
|
Damp fresh snow |
6.87 |
|
Settled snow |
15.61 |
|
Wind-packed snow |
23.41 |
|
Very wet snow |
46.82 |
|
Ice |
57.25 |
Personal safety is very important and I do not recommend climbing onto your roof in the winter weather. If you need to clear the snow on the roof, I recommend using a snow rake or roof rake that is operated from the ground, or hiring a contractor to do the work for you.
Stay safe this winter and use these suggestions to avoid common winter concerns related to snow!
In the news:
Albion Hotel roof collapsed | CTV News
Resources:
Canada CNA preparation guide for snow load and roof collapse CNA-RC_C-bulletin-Snow-Loading-Roof-Collapse-Guide.pdf
Canadian Underwriters Article dangers of rainfall with snow on your roof: Roof collapses feared if freezing rain follows heavy snowfall

Bad Plumbing
Issues with plumbing installation that go against the manufacturer’s recommendations, the city engineering department requirement, and provincial building code requirements
During a recent inspection, I noticed some interesting details that I am sharing as a learning opportunity. The house is almost 100 years old and there were only slight signs of renovations on the outside. The interior renovations, however, completely modernized the space including laminate floors, pot lights everywhere, a five-piece bathroom offering lots of space, and a cozy setting on the main floor. The basement is usually my favourite area to explore because you can tell a lot about the state a home is in from this perspective. This house is another example of why I love basements, and I was less than thrilled to see what was there. Although the basement renovation appears innocuous at first glance, the deficiencies started stacking up once I took a closer look.

The PEX water lines (the white lines in this photo) are a recent upgrade from the original copper lines that greatly improve the reliability of the water supply, but their installation is less than perfect. One disadvantage to PEX water lines compared to the original copper is PEX’s sensitivity to heat. The manufacturer’s installation instructions for PEX water lines require that their installation avoid contact with hot surfaces like the air vent from the furnace and the exhaust vent from the clothes dryer. The issue is not that the high temperatures will melt the lines, but rather that the repeated heating causes weak spots in the material through thermal cycling. In this basement, I’ve circled the three points in less than two feet where the PEX is in direct contact with heat sources. The solution to the issue is easy, simply wrap the water lines with a foam pipe wrap wherever it comes into contact with heat sources. This is a cheap solution that can save you higher repair bills in the future, costing about $1 per foot to protect from heat preventing leaks, ruptures, and a possible flooded basement. Additionally, throughout this basement, I found water lines, copper and PEX, and electrical wires routed too close to heat sources; again, there is a cheap and easy solution to these issues through putting a small piece of pink insulation or card board between the wires and the heat source!

The next issue in this small corner of the basement is with the installation of the water softener. It looks nice and tidy and seems to be okay but looks can be deceiving. Here, the water softener is installed between the city water supply (shut off valve) and the water meter, something that is absolutely not allowed by the city. The correct installation is for the water meter to be installed within a couple of feet of where the city water supply enters the building and then the water softener gets installed after the water meter inside your home. In this image, although this might appear that the meter is located within a couple of feet of the shut off valve, it isn’t. In this case, the water line comes into the home, and the water softener is plumbed in before the water meter rather than after it. The issue with this installation is that, when the water softener goes into the regeneration mode, the purge and rinse water that is used to regenerate the softener is not measured for billing purposes. At 100 litres per regeneration cycle and one regeneration approximately every three days, that works out to 12,166 litres per year; at the current water rates, that is about $26 per year. While this seems to be a pretty insignificant amount of money in comparison to the $200 that I would estimate to repair this, the homeowner is not only responsible to fix this, but can also be fined by the city when a city official finds the infraction.

This final photo demonstrates a concerning potential water contamination hazard. There are two plumbing systems, the water supply (potable/drinking water) and the waste system (sewer). These two systems are isolated/independent from each other to prevent waste products and sewer gases from entering the water supply, called cross-contamination. To maintain the isolation of these systems, the Building Code of Ontario (under the cross-contamination and backflow) requires that any component in the water supply is physically distanced from the waste system. An example of this physical distancing occurs with fixtures like sinks, bathtubs, and toilets; in a sink, for example, there is an air gap between the faucet that sits several inches above the overflow hole for the sink. The other requirement is a water trap in the waste system that prevents sewer gases from entering the home; in a sink, for example, you can see this under the sink in the “P-trap”, the loop of pipe where there is often a disconnect so that you can remove it to retrieve items that have gone down the drain. In this corner of the basement, the drain line for the water softener is connected directly to the vertical waste pipe without an air gap or water trap. While there might be a low probability of sewage backup in this set up because of the upward loop that is circled, there remains a very high possibility of contamination from sewer gases and aerosolized bacteria. Given that this contamination would go into the water softener, this means it would end up throughout your home’s clean water supply, including the water you use to wash yourself and your dishes (for an example of this happening, see How a water softener poisoned a family - Backflow Consulting & Training)! The installation instructions for a water softener would never recommend this arrangement. Instead, they typically recommend running the drain to the laundry tub where there is an air gap to the tub. Some plumbers also chose to run the drain along the floor to the floor drain (sticking it into a pried open floor drain). This method seem okay if the floor drain is dry; however, if the floor drain becomes wet, the water softener’s drain line is now contacting waste water or sewage. For further information about how to avoid this serious health concern for your home’s clean water supply, I would recommend reading:
Cross Connections and Water Softeners – Department of Health, Minnesota
How To Inspect Your Own House, Part 7: Protect Your Water by Preventing Cross-Connections
Buyer beware
In real estate, the seller tries to present a home that can generate enough interest so that many buyers will compete to be the new home owner. Unfortunately, this creates a ‘buyer beware’ environment where sellers’ presentation of the home can blind prospective buyers to the actual state of the house. While sellers are supposed to declare everything wrong with the house, this requirement is difficult to enforce. If the seller claims that they ‘didn’t know’ a problem exists, it is hard to demonstrate they were aware. In this blog post, I provide some observations from a recent inspection request; while the prospective buyers did not proceed with an offer (and therefore the inspection did not happen), a review of the realtor photos caught my interest.

First off, there are many exterior issues.
At the front of the house, the front step is wood and contacting the ground. This pressure treated wood is not rated for contact with soil and should be 6 to 8 inches off the ground to allow for air flow and to maintain a dry environment to prevent rot.
The railing on the upper balcony is also constructed of wood; railings have a maximum span of 6 feet according to the Ontario building code. This means there should be 3 posts instead of the 2 posts that are present. The implication is that it can fail when you need it the most (i.e., when you lean on it or grab it if you lose your balance) and end up falling to the ground.
The downspout for the eavestrough on the entryway is located on the right side of the porch while the drainage off the slope of the floor of the balcony should be to the front. Because of this, the water that falls on the balcony likely pools along the front. Further, the addition of the extension to the eavestrough downspout across the garden suggests that water is pooling in the front corner of the garden. When this type of pooling happens, it is because the grading is incorrect and water is more likely to enter the basement. Finally, the garden surface is built up above the siding which is going to promote leakage into the wall structure.

From this view of the exterior, you can see more problems.
The driveway’s retaining wall is constructed of wood and, based on the short height, it would not have been appropriately tied back into the driveway. This can lead to the failure of the retaining wall with the weight of a car on the driveway; the misalignment and upheaval that is already showing on this retaining wall suggests that it is already starting to fail.
On the front left corner, the electrical mast has been covered with the vinyl/aluminum siding which can lead to overheating of the supply conductors and a fire. The location of the electrical mast head is also within reach of the balcony which is a code infraction for safety reasons.
The front deck and siding on the front corner is again buried and contacting the soil, ideal rot conditions. A much better idea would be to build the deck out of a water resistant material like concrete. Contacting soil and being wet will accelerate the deterioration of the deck and wall structure.
From this view, you can also see that the trees on the right front corner are touching the roof of the house. This contact can damage the eavestrough, increase leaf buildup in the eaves, and the branches will rub on the on the shingles with any wind leading to their premature loss of gravel on the shingles. A single tree removal will cost you $2000 or more.

And the electrical issues outside continue to appear…
DANGER: Do Not Touch
The electrical supply wires are supposed to be over 8 feet above a flat roof or deck. The wire run and drip loop visible in this picture is within reach of a person standing on the deck which can lead to a serious electrical shock. They also appear to be very close to the metal soffit because they can short out to the entire house resulting in the skin of the house being electrified. I would be alerting the Electrical Safety Authority about this serious danger.

There are more problematic wires at the rear of the house!
I can’t tell which type of wires these are from the photo and whether they are electrical, but they should at least be securing to the wall. The penetration through the siding for the wires should also be done with a proper box so that the hole can be sealed preventing the elements from entering the wall cavity.

This photo depicts another electrical design choice that is not recommended.
Having an electrical appliance within reach of a hot tub is addressed in the electrical standard. Although the TV might be compliant with the code’s requirement of a minimum of 5 feet between tub and receptacle, and compliant with the TV’s receptacle being ground fault circuit interrupter (GFCI) protected, keeping electrical appliances well away from water sources is a much safer choice!

In this photo, there is an electrical box connected to the porch skirting. That is not a secure location for an electrical box for a number of reasons. First, the skirting is likely only 3/4” thick and relatively for the fasteners to pull through or fail. Second, the skirting is in contact with the dirt. Once again, wood in contact with dirt will deteriorate which is not providing a consistent point to secure this electrical box. In addition, although not against code, it isn’t wise to have electrical wires routed through your garden. Lots of gardeners like using shovels and forks to dig and the last thing you want to do is puncture an electrical wire with a metal tool!
Finally, there is the structural issue with the using deck blocks with a deck secured to the building. The problem with deck blocks is that they will move up and down with the freezing and thawing of the ground. This movement will pull the deck apart at the ledger board or rip the ledger board off the wall. This is why using deck blocks on the surface of the ground isn’t safe for the construction of attached decks; they must be sunk into the ground below the frost line. Obviously, this is not a registered or compliant deck.

The interior photos show a house that is very visually appealing. This lovely front hall photo is an example. However, as a home inspector, I look beyond the visual appeal.
One question I ask is “what are the heat sources for any rooms with an exterior door?” The real estate listing indicated this house has a forced air system, but there are no registers in the entry wall or bathroom to the right (I reviewed the 360 videos to determine this). As a result, these two rooms will get very chilly in the winter unless they have in-floor heating which is not indicated in the listing. With no heat in the bathroom, there is also a concern about the plumbing freezing, especially with the sink on an outside wall.
Going through the remainder of the house photos and 360 videos, heating seems to be a repeating issue with missing and improperly placed registers in much of the house. A number of windows and patio doors do not have a register in the area which can lead to condensate and mold on window panes, and cold spots in the house. This isn’t a code requirement, but your home inspector should point this out because to will affect your experience in the house.

I personally love basements with unfinished ceilings and wall because I can see the piping, how it is installed, whether it is in good shape, electrical wiring sizes, how the wire is routed and secured, and whether venting is appropriately routed indicating a good design and thoughtful upkeep. The forced air duct shown on the left of this picture is not a good example of ducting. Ducting should flow with minimal bends and as directly to the venting terminal (i.e., register) as possible. I wonder (somewhat sarcastically, but that is how I lean!) if someone was paid by amount of piping that they installed.
Basements also tell you about the general state of the house structure since you can see joists, beams, posts, and the foundation. The foundation is made up of two parts, the footings and the walls. You can’t see the footings, but you can see foundation walls in unfinished basements which can be very telling! Foundation walls show whether there are issues from the outside that are damaging your house (i.e., leaks, cracking) and whether the homeowner is successful at maintaining their investment. To the right of this picture, you can see that items seem to be strategically located at the bottom of what appears to be a crumbing brick foundation wall, potentially to hide this damage. In the bottom 5 to 6 rows, the mortar is deteriorating and the bricks show signs of spalling (i.e., the front of the brick is breaking off). This is the inside surface of the foundation wall so I can only imagine what the wall looks like on the dirt side of the basement. Keep an eye out for items like this when you are doing a home tour!
I hope this helps you to see that, when you are shopping for a home, you need to look past the glitter and pizzazz, and to consider what might be missing, wrong, or in need of repair.
#HomeInspection #BuyerBeware #InformedDecisions #HomeOwnership

Common concerns: Outdoor spaces
Learn what to look for and what not to do for outdoor spaces - whether you’re looking to buy or plan for decks or gardens in your current home!
As a home inspector, I see common concerns in houses and listings. I will discuss these concerns over my next few blog posts but start with a big one – outdoor spaces. One of the biggest, and potentially most damaging, concerns relates to potential water ingress into the building structure. Most houses are constructed of a wood framework with wind and water barriers on the outside, insulation in the middle wall cavities, and then an internal finish layer of drywall or plaster. The wood framework and internal layer are susceptible to rot and mold and need to be kept dry. Moisture is controlled with the wind and water barriers, an air gap, and a durable exterior cladding material to resist driving moisture (such as rain blowing against the side of the building). The cladding material, as well as the water and wind barriers, are water resistant but not waterproof. That means that you want to promote water shedding off the exterior walls and away from foundations. The effectiveness of these efforts is impacted by everything outside of and around the house. Things like trees, gardens, decks, patios and even grass can slow down or increase water within the wall; therefore, increasing the likelihood of water ingress. If you are planning on building a deck or planting a garden for your outdoor space, I am providing some examples here of what not to do!
In this first example, you can see in image 1 that the deck is built around the air conditioner, the gas meter, and the venting for two appliances. Surrounding the air conditioner cuts off the free airflow that carries heat away. This will not only reduce the cooling potential for the house, but it will also overload the air conditioner and shorten its life. When the condenser fails, which is what happens from overloading the unit, a replacement could cost upwards of $7,000; however, would also need to remove the deck to replace the condenser unit. In addition, the piping from the condenser to the house evaporator is installed below the deck.

Image 1: Gas meter and air conditioner buried in deck
In image 2, you can see that the gas meter and the service regulator are at or below the deck surface. This is a code violation. The gas regulator needs to be above the snow line to prevent ice formation in the regulator’s vent that may result in the failure of the regulator. There needs to be 33cm (13”) between the bottom of the regulator and the surface below it. The venting of appliances is required to be above the snow line as well. To the right of the sliding patio door, you can see two white pipes extending halfway up the door. These are the air intake and combustion vent terminations for a direct vent appliance (e.g., furnace). These pipes should be secured and moved away from the doorway where combustion products can enter the house through an open doorway. On the other side of the patio door, you can see the drier vent just below the deck surface. This is also a code violation to vent below a deck because it can lead to a vent fire under a few different scenarios. Here is a link to a CBC article on the dangers of drier vent fires to learn more: Dryer fires a real hazard that can happen at a moment's notice | CBC News

Image 2: Gas vent and inlet pipes not secured and at doorway
Your house has an outer layer or cladding to protect the components in the wall that do not like to be exposed to water, snow, and wind. This outer layer could be bricks, stone, vinyl siding, wood cladding, stucco, or a number of other materials. They are all designed to repel water but they don’t provide 100% waterproof protection. The cladding can’t protect valuable house from a flood or water lying against it; rather, the cladding is installed to allow for water to drain out of the wall construction as well as promoting air circulation to help dry out the internal wall when there is moisture that gets in. This drainage is to protect your interior from rot and mold. Image 3 shows a deck that is installed over the wall cladding that hasn’t been done properly and is now showing signs of moisture damage. To install properly, flashing material would need to be added to redirect the water from the cladding. I can guarantee that this wall construction is also compromised and there is a moisture issue within the house as a direct result of this deck placement. Since it is within the wall construction, it is almost impossible to see until it is too late.

Image 3: Deck against wall cladding causing damage
Similarly, in image 4, the deck looks beautiful but is built over the bottom run of the wall cladding without a flashing material. Looking carefully at the bottom of the cladding on the bay window you can see indications of damage to the cladding at the interface of the patio and the building. Flashing that should be used would be placed under the cladding and laid over the patio to direct surface water away from the wall.

Image 4: Patio over wall covering showing water damage
Another common cause of wall and foundation moisture issues are gardens that are built up around the home. In image 5, you can see that the garden height has been increased and now covers the wall’s weep holes (those spaces you can see in the brick work). Typically, these holes drain water that has gotten into the wall cavity and allow air movement to keep the wall cavity dry. With the weep holes covered, soil moisture and microbes can directly enter the wall structure. This is not what you want. Imagine putting a piece of wood on the ground – how long would it take before it becomes waterlogged and shows signs of rotting? It is necessary to have the soil sloped away from the foundation to divert ground water away and there should be at approximately 8” between the soil and the bottom of the wall covering. Additionally, the trees in this garden are too close to the house leading to moisture damage (as shown by discolouration of the brick) and their roots attacking the foundation walls. Over time, trees planted too close to the house not only contribute to moisture damage, but also keep your foundation and wall cladding from drying out and they can also be fire hazards.

Image 5: Garden covering brick weep holes
The tree in image 6 is another example of growing too close to the house and the chimney termination which is also a fire hazard.

Image 6: Tree too close to home and chimney vent
If you are looking at a home where someone has added gardens, a patio, or a deck, here are some things to look for:
damage to the wall cladding;
moisture stains;
decreased separation of cladding from the soil;
compromised continuity of the cladding where moisture can enter the wall; and
construction around exterior components like gas meters, regulators, vents and air conditioners that can be dangerous.
#HomeInspection #OutdoorSpaces #WaterDamage #FireHazards #HomeOwnership

Thoughts on a recent inspection…
The housing market in Guelph is a seller’s market where requests for inspections as conditions of sale could lead to your offer not being accepted. No one wants to miss owning that special house because of an inspection, but that does not mean that you cannot have an inspection. I recently did a brief, verbal inspection on a house in Guelph during a 90-minute walk-through with the potential buyers. I pointed out several concerns and even had to call Enbridge for a gas leak that I found during the inspection.
A quick look under the sink suggests everything is fine but looks can be deceiving. This “conveniently” placed bucket under the kitchen sink was there to collect the dripping water coming from the slip joint on the left side of the double sink. The drainpipe is not sloped correctly and was actually level to the trap which can lead to the pipe being clogged with debris. Additionally, the plumbing pipes coming up through the cabinet base were free to move around. This can lead to wear on the copper and a leak. Unfortunately, this was not the only plumbing concern. The upstairs bathroom tub took a full 5 minutes to drain the 1 inch of water I put into the tub. It could be a “massive hairball” in the drain, or it could be something else. As the floor was spongy around the tub and the ceiling below the tub was very poorly patched, there was likely also a leak in the plumbing.
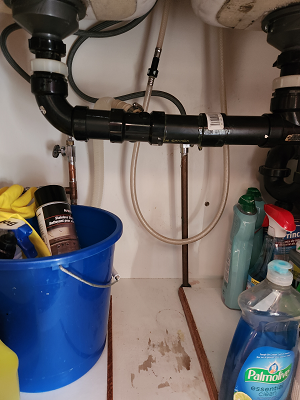
Under sink “convenient” bucket placing
Electrical inspections are always exciting and telling. I always look for installation problems in the electrical system. This house had aluminum wiring for one of the circuits and although they used the correct breakers (thankfully!), they didn’t use anti-oxide paste to prevent oxidization and provide thermal stability to the connections. Over time, these wires are likely to work loose, overheat, and can not only fry any connected devices, but also potentially cause a fire (on a personal note, I had this happen in a rental many years ago and luckily it only fried a microwave!). I also found that most of the ground wires were twisted together rather than using the individual ground lugs in the panel that are required by code. An additional concern was that there were some wires at the breaker showing melting insulation. The concern here is that the load on the circuit has produced enough heat to damage the wire. It is likely then that there is insulation melted elsewhere on this line and a fire could start in those places.

Melted insulation on wiring
Electrical panels are supposed to be installed on noncombustible surfaces for this reason; yet, this panel was installed on plywood (very combustible) and surrounded by spray foam insulation (also very combustible).

Electrical panel on combustible surface
Many homeowners like to renovate their basements to obtain more living space. Renovations in this basement included moving the laundry room, adding a downstairs bathroom and shower, and enclosing the utility room. I keep thinking that I am not able to be surprised about how poorly many renovations are done and when work is done as cheaply (or quickly) as possible while sacrificing quality. A good example of this is in this next photo. The wood screw beside that water line is problematic as those screw threads are designed to cut into wood and will cut into plastic water lines just as easily. Wood screws should not be used to secure piping; there are specialty plastic clamps designed specifically for this use that will not damage the water line!
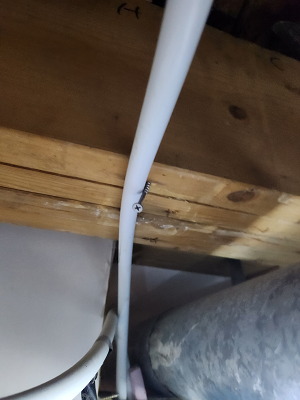
Improperly secured water line
Then there is the gap in the basement shower surround that has a gap at the bottom. This gap should be sealed with caulking to prevent water from entering the wall and damaging it.

Gap in shower surround
Attic inspections are very important. They should always be done and can inform you of possible water damage, missing insulation, mold growth, and fire hazards. The attic is a place where you can see interesting artifacts. In this attic, I found a stone rake which I think was there to move insulation around to cover cold spots, the exposed spots where the insulation was no longer covering them. The issue in this attic was that there wasn’t enough insulation; there should be 20-25 cm (8-10”) of insulation here.

Insufficient insulation in attic
In addition, there shouldn’t be insulation around the vent pipe for the water heater and furnace like this since blown cellulose insulation is combustible.
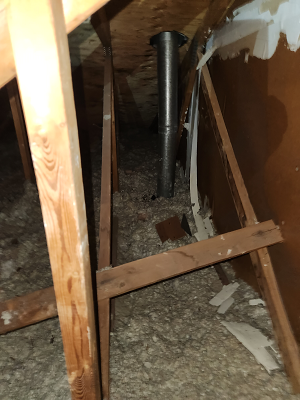
Insulation around water heater/furnace vent pipe
In Ontario, decks are required to be built to the current provincial building code (and any additional municipal requirements that vary amongst municipalities). Although you are only required to obtain a permit for a deck 60 cm (24”) in height at any point of the deck from the ground to the deck surface. Nevertheless, not needing a permit doesn’t mean you should build a crappy deck. This deck was not built to code and is so poorly built that it is likely to collapse. Some of the issues include that the main support beams are only 10x10cm (4x4”), the cinder block supports are turned on their sides, and the decking was blocking the gas regulator for the house. Typically, beams need to be larger than your joists and cinder blocks are strongest when upright (i.e., the holes are pointing up).

Poorly built deck
It was this blocked gas regulator where I detected the gas leak…but don’t worry, everything is okay! Enbridge responded quickly to fix the leak in the gas piping!
#HomeInspection #BuyingInASellersMarket #InformedDecision
Inspections in a sellers market

With it still being a sellers market, making offers conditional on home inspections is not always possible. As an alternative, I'm available to attend showings with prospective buyers to complete a pre-inspection as suggested by this article from 2022 during a similar market. I can also do a virtual pre-inspection for you using listing photos. Making an informed choice is so important - reach out and we can figure out what type of inspection will work best for you!
https://globalnews.ca/news/8706999/home-inspections-buyer-protections/
#HomeInspection #informedchoices #preinspection

Real estate listing insights
As a way of sharing knowledge that can be helpful to those of you looking for a new home or for your existing home, and to help to understand what home inspectors do, I will be sharing my observations in this and upcoming posts. Please note that I am not sharing the address or realtor information as this is just for educational purposes.
To keep my home inspection skills sharp, I review many listings in Realtor.ca and use the publicly available pictures to see what I would identify as issues. As a way of sharing knowledge that can be helpful to those of you looking for a new home or for your existing home, and to help to understand what home inspectors do, I will be sharing my observations in this and upcoming posts. Please note that I am not sharing the address or realtor information as this is just for educational purposes. Feel free share a listing if you would like me to feature it in an upcoming post!

This semi-detached home has a nice curb appeal, but I notice the absence of an eavestrough on the circle section of the roof. There is likely no flashing to divert the water away from the siding. The visible stain suggests that a significant amount of water is flowing down the siding. Siding is designed to repel water, but this staining suggests there is too much water hitting it so the wall in this area should be inspected for water damage both on the exterior and interior of the house.

This is a nice looking kitchen, but I see that there is a plug directly behind the left side of the sink. This is a code violation (section 26-724 of the Canadian Electrical Code) and for good reason! I cannot say for sure why this plug is here, and most people wouldn’t know that it breaking the law, but it also poses a life threatening situation! How dangerous is it? A little splash of water on the plug while you are doing dishes in that metal sink might enlighten you to one of the dangers. Additionally, these plugs are not designed for wet environments are likely to fail. The remedy to fix this would be to have an electrician move the plug (about $600) and then a drywaller to repair the damage (about $300). As a home inspector, I would also be checking the following in this kitchen:
the plumbing work;
whether the plugs are GFI protected since they are within 6 feet of the sink;
measuring if every 4 feet of counter top has a receptacle;
checking the installation of the cabinets and cupboards; and
investigating what is going on at the end of the cabinets by the refrigerator (look closely at the right hand side of the counter – where is the kettle cord going???).

The rest of the house interior looks okay, but the backyard is scary. The privacy fence is one good windstorm away from being a bridge to the neighbor’s deck. The stairs should be replaced, not just because they are leaning a little to the right, but also because the span between the stringers (the supports for the steps) shouldn’t be greater than 24”. Stepping on them would not only be springy, but also dangerous. The seat rail combination was a design back in the 80’s that is no longer recommended as young children can use the seats to scale the deck railing and fall to the ground. The deck blocks are also an issue. Everyone just drops them onto the ground and builds the deck on them, but you are actually supposed to mount the deck block below the frost line (see Using Concrete Deck Blocks Instead of Footings | Decks.com by Trex). At minimum, the building code requires removal of the topsoil and the block to be placed on compacted subsoil. The rationale is that the topsoil will settle over time and from the frost shifting the supports around. Additionally, the blocks are supposed to be placed between 6 to 8 feet apart and I suspect that there isn’t enough support for this deck since the house is almost 20 feet wide. Other things I would investigate with the deck are:
the post circled appears to be leaning slightly, so I would check that the supports haven’t failed and are still vertical;
if the deck is attached to the house (not floating) and, if so, how much damage is being done with the deck moving every winter;
whether the deck framing is failing and built to safety standards; and
if the deck surface is close to failing.
Repairing a deck of this size would cost approximately $10,000 to resurface. If you had to also fix the framing and opt to take the supports below the frost line, it would be about $20,000.
Home inspections help you to know the issues and potential costs to fix them before you buy, so you can make an informed decision!
#homeinspectioninsights #knowbeforeyouown